
From Sketch to Scale: How TRLs Guide Hardware Success
- Admin
- Apr 21, 2025
- 5 min read
Developing a hardware product is a thrilling yet daunting journey. Unlike software, physical products face real-world constraints—supply chains, manufacturing defects, and regulatory hurdles. Many startups fail because they rush from idea to production without structured validation.
TRLs are a systematic metric (originally developed by NASA and now adopted globally) to assess the maturity of a technology. They act as a risk-management framework, ensuring each stage of hardware development is validated before committing to costly next steps. The scale ranges from TRL 1 (basic research) to TRL 9 (commercial deployment), with each level representing a gateway of technical certainty.
For hardware startups, TRLs force discipline in three key areas:
Technical Feasibility (TRLs 1–4): Proving core functionality at component level.
Environmental Validation (TRLs 5–7): Testing reliability under real-world conditions.
Manufacturing Readiness (TRLs 8–9): Ensuring scalability and compliance.
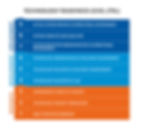
The 9 TRL Stages – A Roadmap for Hardware Entrepreneurs
Here’s a deeper look at each stage and why it matters:
TRL 1 – Basic Principles Observed
This foundational stage involves pure scientific research to determine if the underlying principles of your technology are valid. For hardware developers, this means conducting theoretical analyses, literature reviews, and small-scale experiments to verify physical possibilities. At TRL 1, you're not building anything yet - you're answering fundamental questions about whether your concept violates any laws of physics or material science.
The work here focuses on mathematical modelling and simulation, often requiring collaboration with academic researchers or subject matter experts. Many sustainable hardware projects fail at this stage when teams discover their proposed energy harvesting method or material properties don't actually work as hypothesised. Proper documentation of these early findings is crucial, as they form the scientific basis for all future development.
TRL 2 - Technology Concept Formulated
With basic principles validated, you now develop a concrete technology application and identify potential implementation paths. This involves creating initial design concepts, identifying required subsystems, and outlining technical specifications. For an IoT device, this would include defining communication protocols, power requirements, and environmental operating ranges.
At this stage, teams should conduct competitive analysis and preliminary patent searches to ensure novelty. Many hardware startups make the mistake of treating TRL 2 as merely an "idea phase" without proper technical scoping, leading to unrealistic expectations about performance or cost. A thorough TRL 2 process includes rough CAD models, block diagrams of electronic systems, and initial material selection criteria.
TRL 3 - Experimental Proof of Concept
Here you build your first physical prototype to demonstrate critical functions under controlled conditions. This is typically a "breadboard" version using off-the-shelf components - messy wiring and exposed circuits are expected. The goal isn't aesthetics but proving your core technology actually works as predicted in TRL 1-2.
For sustainable hardware, this stage often reveals unexpected interactions between components. A common pitfall is declaring victory after a single successful test while ignoring intermittent failures or edge cases. Proper TRL 3 validation requires repeated testing under various operating conditions and documenting all failure modes before proceeding.
TRL 4 - Component Validation in Lab
Now you transition from proving concepts to engineering reliable subsystems. Each major component (power supply, sensors, wireless modules) undergoes rigorous, isolated testing to verify performance specifications. Environmental stress testing begins here - temperature cycling, vibration tests, and accelerated life testing for critical parts.
Many hardware teams underestimate this stage, leading to "integration hell" later when subsystems interact poorly. A proper TRL 4 process includes creating test fixtures for repeatable measurements, establishing performance baselines, and beginning Design for Manufacture (DFM) considerations for custom parts. This is when you discover whether your chosen battery can actually deliver promised cycle life or if your solar cell degrades too quickly.
TRL 5 - System Validation in Relevant Environment
The first true integration milestone where all subsystems work together outside laboratory conditions. Your prototype now resembles the final product in form and function, undergoing testing in environments that simulate real-world use. For outdoor IoT devices, this means exposure to weather; for industrial equipment, testing in dirty or electrically noisy environments.
This stage often reveals unexpected system-level failures - interference between wireless and sensor circuits, power management issues during sleep modes, or mechanical failures from thermal expansion. Proper TRL 5 validation requires documenting all failure modes and establishing mean time between failures (MTBF) estimates before committing to tooling.
TRL 6 - Prototype Demo in Operational Environment
Your near-final product now undergoes extended testing in actual field conditions with real users. This is the first exposure to uncontrolled variables - user handling, installation errors, and unpredictable environmental extremes. Data collection shifts from "does it work" to "how reliably does it work over time."
For sustainable hardware, this stage often reveals material degradation issues or maintenance requirements that weren't apparent in shorter lab tests. Teams should establish clear pass/fail criteria for reliability metrics and be prepared for multiple design iterations before freezing specifications. Many crowdfunding campaigns fail by treating TRL 6 as a launch rather than a validation stage.
TRL 7 - System Prototype Ready for Manufacture
The engineering focus shifts from functionality to producibility. You're now optimising for assembly line processes, supply chain availability, and cost targets. This involves creating manufacturing drawings, qualifying vendors, and building pre-production units using actual production methods.
Common pitfalls include underestimating tooling lead times or failing to design for testability. A proper TRL 7 process includes Design for Assembly (DFA) analysis, failure mode and effects analysis (FMEA), and pilot runs to identify production bottlenecks. This is when you discover whether your beautiful CNC-machined prototype can actually be injection moulded at scale.
TRL 8 - System Complete and Qualified
Final certification and validation before full-scale production. Your product now passes all regulatory requirements (FCC, CE, safety standards) and undergoes rigorous quality assurance testing. Production processes are validated through larger pilot runs (typically 100-1000 units) to confirm yield rates and consistency.
This stage often reveals subtle but critical issues - intermittent failures at certain temperatures, cosmetic defects in mass production, or supply chain inconsistencies. Teams should conduct thorough reliability demonstration testing (RDT) and establish quality control procedures before ramping up. Many hardware startups encounter costly delays at TRL 8 when discovering their product doesn't consistently meet certification requirements.
TRL 9 - Full Commercial Deployment
Your product is now in continuous production with established quality controls and ongoing improvement processes. However, TRL 9 isn't the end - it's the beginning of product lifecycle management. Field data continues to inform design revisions, manufacturing optimisations, and potential derivative products.
For sustainable hardware, this stage includes monitoring actual environmental impact versus projections and implementing recycling/refurbishment programs. Successful TRL 9 execution requires robust systems for tracking field failures, managing component obsolescence, and continuous cost reduction while maintaining quality.
The Hidden Challenge: Why Startups Skip TRLs
The temptation to jump from TRL 3 (proof of concept) straight to TRL 7 (manufacturing) is strong, especially under investor pressure. But this leads to three costly disasters:
The "Works on My Desk" Fallacy: A prototype that functions perfectly in a lab might fail in the field.
The "Invisible" Manufacturing Bug: A design might look production-ready until you order 10,000 units.
The Premature Scaling Trap: Crowdfunding campaigns often force startups into production before TRL 8.
The Reward: From Sketch to Scale with Confidence
Every successful hardware company—no matter how small—follows a version of this process. The journey is grueling, but TRLs provide guardrails, ensuring you don’t build the wrong product or worse—a product that can’t be built.
So, where are you on the TRL scale? If you’re navigating the hardware startup maze, remember: Great products aren’t rushed—they’re refined.
Need help assessing your product’s readiness? Let us know what you're working on; we can assist you.